Saturday, March 24, 2012

Official Food Fest Day


Saint Patty’s Day has come and gone, but the Irish side of me never dies.  Mainly the, lets-create-a-day-solely-to-feast mentality. Saint Patrick's Day was made an official feast day in the early seventeenth century, and sprouting from that it became a celebration of Irish culture in general. As far as the green color scheme goes, it started our being a blue orientation, but over the years the color green became the color of choice. Even in the 17th century, people were rockin out with the green ribbons and shamrock adorned sweater vests. Ok, maybe they weren’t wearing sweater vests back then, but I’m sure some ladies placed a few in their garter belts. Last piece of knowledge for ya today, the whole three leafed plant actually came into play to explain the Holy Trinity to the pagan Irish. Boom! Knowledge!


Green things I saw on P-day
Now, to the good stuff. For this years St. P day I decided to make some nice alcohol infused cupcakes to bring to the ladies at work as a tasty treat. Once again I found an amazing recipe from Chef Chloe for Chocolate Beer Cupcakes with Irish Whiskey Buttercream Frosting. I’m not a big beer drinker and definitely not a hard liquor fan, but I was really excited to make these!


Beer time at Tony's


Ingredients
Chocolate Beer Cupcakes
  • 1 ½ cups all-purpose flour (or gluten-free all-purpose flour plus ¾ teaspoon xanthan gum)
  • 1 cup packed brown sugar
  • 1/3 cup cocoa powder
  • 1 teaspoon baking soda
  • ½ teaspoon salt
  • 1 cup stout beer (I use Trader Joe's oatmeal stout)
  • ½ cup canola oil
  • 2 tablespoons white or apple cider vinegar
  • 1 tablespoon pure vanilla extract
Irish Whiskey Buttercream
  • 1 cup non-hydrogenated shortening (I use Spectrum Organics)
  • 3 cups powdered sugar
  • 1 teaspoon pure vanilla extract
  • 2 to 5 tablespoons soy, almond, or rice milk
  • 3 to 4 teaspoons Irish whiskey
Caramel
  • 1 cup packed brown sugar
  • ¼ cup vegan margarine
  • 4 teaspoons soy, almond, or rice milk


Finished Product

Procedure
To make the Chocolate Beer Cupcakes
Preheat the oven to 350 degrees F. Line 2 (12-cup) cupcake pans with 14 cupcake liners.
In a large bowl, whisk together flour, brown sugar, cocoa, baking soda, and salt. In a separate bowl, whisk together stout, oil, vinegar, and vanilla. Pour the wet mixture into the dry mixture and whisk until just combined. Do not over mix.
Fill the cupcake liners about two-thirds full with batter. Bake for 16 to 18 minutes, or until a toothpick inserted in the center of the cupcake comes out clean with a few crumbs clinging to it. Cool the cupcakes completely before frosting.
To make the Irish Whiskey Buttercream
Using a handheld or stand mixer, beat the shortening until smooth. With the mixer running on low, add powdered sugar, vanilla, and 1 tablespoon nondairy milk at a time, as needed, until frosting reaches a spreadable consistency. You may not need to use all of the nondairy milk. Add whiskey, 1 teaspoon at a time, until desired taste. Beat on high for 2 more minutes until light and fluffy.
To make the Caramel
In a small saucepan, over medium heat, heat brown sugar, margarine, and nondairy milk, stirring frequently.  Once mixture comes together, increase heat to medium-high and let cook for one to two more minutes, until it begins to boil and the bubbles move into the center of the caramel. Remove from heat.
To assemble the cupcakes: Frost cooled cupcakes with buttercream and dust with cocoa powder. Drizzle warm caramel over cupcakes using a fork or a squeeze tube. Caramel will be easier to work with while warm.
Voila! These are super dense and very beer-licious! Good to have a nice cup of black coffee to go with them!

Indian Vegetable Somosa

Holas again! Every time it gets slightly cold out, I am always so eager  to make some kind of warm casserole, hearty dish. Then I will  just envision some snow outside and a wall of books beside me and I’ll be oh so comfortable. But alas, no snow, the closest I will get is some soot from a building being on fire near by. Anyhoo..I found this recipe from an old Vegetarian magazine and I knew I had to make it! It was so easy, but it seemed super fancy when I was making it and especially when I was eating it.

don't judge my crust, I was impatient


Indian Vegetable Somosa

Crust:
½ c. all-purpose flour
½ c. whole wheat pastry flour
¼ tsp. salt
2tbs. vegetable oil

Filling:
1 tbs. yellow mustard seeds
1 tsp. curry powder
1 tsp. ground ginger
½ tsp. ground cumin
¼ tsp. red pepper flakes
5 medium potatoes, peeled and quarted
1 ½ tsp. vegetable oil
1 medium onion diced
1 medium carrot diced
3 cloves of garlic, minced
1 cup frozen peas
1 cup low-sodium vegetable broth
2 tsp. agave nectar
2 tbs. soymilk

Directions:
To make this guilt free crust, preheat the oven to 375*F, whisk the flours and salt in a bowl. Stir in the oil until clumps form. Add 6 to 10 tbs. cold water, 1 tbs at a time, until the dough starts to hold together.
Shape into a ball, cover with a damp towel and set aside.

For the filling:
Stir together mustard seeds, curry, ginger, cumin and red pepper flakes in a bowl and set aside.

Cook potatoes in boiling salted water 15 minutes or until tender. Drain return to pot and mash, leaving small chinks.

Heat oil in skillet over medium heat. Add the onions, carrot, and garlic and sauté 5 minutes, or until carrots are tender.
Move onion mixture into potato mixture in center.
Toast 30 seconds. Stir in peas and broth.
Fold onion mixture into potato mixture, stir in agave nectar. Season with salt and pepper.
Spread filling in a 9-inch pie pan. Set aside.

Roll out crust dough to 11 inch circle on floured work surface.
Cover filling with dough, pressing down to make sure no air pockets remain. Trim away excess dough, and crimp edges with fingers. Cut X in center to vent steam; brush with soymilk just before baking. Place pie on baking sheet and bake 40 to 50 minutes, or until crust is golden brown. Let stand for 5 minutes before serving.


Friday, March 16, 2012

Homemade Vegan Mac & Cheez

Do you ever have those days where it just seems like everything is somehow coming together, or things that you thought would never make sense, make sense? Yeah- it wasn’t one of those days, but it was close! Days in which we run, always seem to be better than the non-active days.

We headed out to pound the pavement so that we could make a new recipe I discovered, vegan mac & cheez. Sometimes running through the ‘hood reminds me of what I would imagine Puerto Rico to look like, and then the rest of the time it just looks like the Brady Bunch neighborhood, or Tim Burton’s Edward Scissorhands location.


alley time
After getting out all of those toxins it was time for a tasty soy latte from Starbucks, (thank you Andrea!) and get crackin in the kitchen.

my interpretation of me and B running. Chocolate Mint and Lemon Strawberry.

This recipe is from Chef Chloe, an all out inspiration; gorgeous, a cook, and vegan Cupcake Wars winner! What?! What?!

Ok, so this is suppose to serves 4 to 6, but I added two more cups of broccoli (trying to be good!) than what was called for and I think we will be eating on this for several meals!

Ingredients
1 pound elbow macaroni or piccolini
3 cups broccoli florets
¼ cup vegan margarine
1/3 cup all-purpose flour
3 cups soy, almond, or rice milk
½ cup nutritional yeast
2 tablespoons tomato paste
2 teaspoons sea salt
1 teaspoon garlic powder
1 tablespoon lemon juice
1 tablespoon agave (I left the agave out since I thought the tomato paste would help with sweetener)


looking cheesey!

Procedure
Bring a large pot of heavily salted water to a boil.
Add macaroni and cook according to package directions.
Add broccoli for the last 5 minutes of boiling and let cook until broccoli is fork tender.
Drain and return to pot.

Meanwhile, in a medium saucepan, make a roux or paste by whisking the margarine and flour over medium heat for 3 to 5 minutes.
Add nondairy milk, yeast, tomato paste, salt, and garlic powder to the saucepan and bring to a boil, whisking frequently. Reduce heat to low and let simmer until the sauce thickens.
Adjust seasoning to taste and stir in lemon juice and agave.
Toss the noodles and broccoli with the sauce and serve immediately.


voila!
I wasn’t hungry when I was making this dish, but once I tried it, it was hard to stop!

Sunday, March 11, 2012

Sprinkles ATM: Heaven in 90210

Waiting in line
This is why I’m fat: Sprinkles ATM. Better known as an “ACM”, or Automated Cupcake Machine. This little beauty is the newest kid on the Santa Monica block, and let’s just say it is definitely not disappointing.
As I am sure most of you know, Sprinkles Cupcakes (the founder of the cupcake bakery craze) as installed a 24 hour cupcake dispenser right next to its brick-and-mortar shop on
S. Santa Monica Blvd.

The idea started back when Candace Nelson (the founder of Sprinkles) was preggers and would have the late night cravings for a icing topped dessert at midnight. Ingenious! Thus, the idea for the cupcake ATM was conceived!
Cupcakes at $4 a pop, and an extra 75 cents for each box

 Slowly, I have been turning more and more into an old lady. Trying to go to bed before 10, so that we can wake up early to run kind of puts a damper on being a night owl. In my attempt to spice things up, I decided that we should take a little trip down to the 90210 zip code and try out this God given machine.

Pulling up to the store front we were not greeted by a glowing pink display of ATM love, but by a block-long line. Apparently it has been dispensing out up to 1,000 cupcakes a day, when it only holds 600, at one point breaking down. I heard that there were lines for the ATM even when the bakery itself was open and ready to serve. This was going to be good.


Lemon Coconut, Pupcakes, Irish Chocolate


We parked and began our wait. When you’re in a line at 10 o’clock on a Friday night to get a cupcake from a vending machine, you have my approval. Instantly the people behind us started up a conversation, so the hour and a half actually went by pretty quickly.

Eventually it was our turn with the candy colored machine. Selecting through all of the full colored pictures of the various cupcakes that lingered behind the glass wall was a bit overwhelming. We were both under the impression that they would have their full day menu, plus some, available for purchase. However, they did not have the vegan red velvet listed. After that wait though, we weren’t walking away empty handed.


Irish Chocolate


Ch’en got two little pupcakes, a sugar-free cake with “yogurt” frosting (they had a doggie menu!!) and the hubs and I split an Irish Chocolate cupcake along with the Lemon Coconut.

We carefully loaded them back into the car, made Ch’en take a back seat and headed home. Brewed up a cup o’joe decaf and indulged. Oh sweet-glorious-universal-of-cupcake-love, they were amazing.  


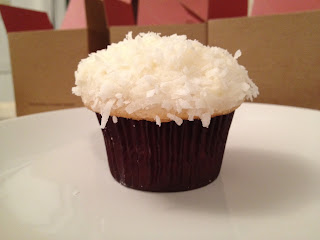
Lemon Coconut
  The frosting-cake ratio is always the best at Sprinkles. The perfect amount of lemon infused butter cream frosting dipped in fresh shredded coconut on a Madagascar bourbon vanilla cake. This is one of my favorites by far. The Irish Chocolate was like having Darby O’Gill dance inside my mouth. Belgian dark chocolate cake with a swirl of Baileys Irish cream cheese frosting and a cute little shamrock to adorn the snow white covering. And not that I am proud of this, but I did try a little nibble of Ch’en’s (I had to make sure he would like it!) and it was quite tasty too!


The line may be long, but every bite is worth it. Now time for a run!


Friday, March 9, 2012

Vegan Coconut Macaroons...with a dash of pink!

“Jem...Jem is excitement! Oouu Jem...Jem is adventure!Ooouu...Glamour and glitter,Fashion and fame!” oh the fashion…how I just loved to go into my sisters coveted collection of pristine plastic figurines and replace Kimber’s shoes with Aja’s. Those were the glory days of fashion, and still to this day I wish that I could have Kimber’s pink flamed hair. Since I can’t (boo job dress codes) I am forced to just buy, eat, and take pictures of all things pink.

This somehow led me to making macaroons. Not sure how, but it’s not about the destination...it’s about the journey.

I have never made these before, but the mate likes coconut, so figured I would give it a try. For these easy vegan coconut macaroons,


Ingredients:


 Gather two cups sweetened shredded coconut

 One cup reduced-fat coconut milk ( I used vanilla almond milk, to try to cut down on the fat, but I’m sure the coconut milk would have been heavenly)

 two tablespoons agave nectar

 two tablespoons all-purpose flour

 one teaspoon vanilla extract

 1/4 teaspoon salt


Directions:


 Preheat the oven to 350 degrees

 coat a baking sheet with parchment paper or cooking spray

 Whisk together the coconut milk, agave nectar and salt in a heavy saucepan over medium heat

 Add the flour and whisk thoroughly

 Heat the mixture to a full boil, and continue to boil for about two minutes or until it has thickened.

 Remove from the heat and whisk in the vanilla, coconut, and maybe a few drops of red food coloring for some pretty in pink delights!

 Drop the mixture by tablespoonfuls onto the baking sheet

 bake the macaroons for 16 minutes, or until golden brown


These were so delish, we could have devoured them all in one sitting, but also knowing that coconut can give you the runs if you eat a mass amount also kinda scared us into portion control. Pleasant ey?


Friday, March 2, 2012

A Trip to the Funny Farm

 “Oh no, I am not being eatin’ by zombies tonight..” Ok, so really the only zombie issue that I might have is when it comes to Ch’en and his growing obsession with eating. Not just things that should be eaten, but really anything that he can inhaled into his little turtle-pig mouth. Not pleasant.


The old LA zoo, however, now that is something that is pleasant. Yesterday we went over to the old zoo that is now abandoned, but you can still go and look around. Before heading out though, we had to have our mile high stack of vegan pancakes (we missed national pancake day, so it needed to be made up)


vegan banana pancakes
Ok, back to the zoo…it was originally built in 1913, but between politics, the war and financial issues, the zoo didn’t hold its glory like it should have.


It is a quirky little place to go and walk around, have a picnic and just imagine all of the lions, tigers and bears that use to inhabit the old cages.


hiking trail


Bear cave

While we were there, I had to have my little model pose in one of the disheveled bird cages. The best part is that he knew exactly what I wanted him to do. He walked up the little hill, into the main cage, through a door and into the front cage and sat. Come on, now that is one gifted little pug, if I do say so myself.

It's a Chennasaur!
After our hike and scouring around the park we needed refueling, so homemade vegan brownies it was. Come on! We ran and then went on a hike, that deserves some extra carb loving.

The recipe I adapted from The Joy of Vegan Baking.


Ingredients:


• 1 1/2 cups granulated sugar


• 3/4 cups unsweetened applesauce ( I used 1 banana, ¼. Cup canola oil, and ½ cup almond milk, only because I didn’t have applesauce)


• 2 tablespoons water


• 2 teaspoons ground flaxseed


• 1/2 cup water


• 2 teaspoons vanilla extract


• 1 1/3 cups unbleached all-purpose flour


• 3/4 cup unsweetened cocoa powder


• 3/4 teaspoon baking powder


• 1/4 teaspoon salt


• 1 cup nondairy semisweet chocolate chips


• 1 cup coarsely chopped pecans or walnuts (optional)


Directions:


• Preheat oven to 350 degrees. With canola oil, grease an 8 x 8-inch baking pan.


• In a medium-size bowl, stir together the sugar, applesauce, and 2 tablespoons water.


• In a small bowl or food processor, combine the ground flaxseed with the 1/2 cup water. Add this to the applesauce mixture, along with the vanilla, and stir to combine.


• In a separate small bowl, combine the flour, cocoa, baking powder, salt, chocolate chips, and nuts, if using. Add to the applesauce mixture, and stir just to combine


• Pour into the prepared pan and bake for 40 minutes. The finished product should be moist. Bake longer if you like a cakier result. Remove from the oven and let cool before cutting. Store leftovers in the refrigerator for up to 5 days or in the freezer for up to 3 months.